Pagina's

zaterdag 31 juli 2010

Hoe het klokje thuis tikt, tikt het nergens/ There's no place like home.

En toen gingen we naar Zweden. En wat we daar deden? 
We vertrokken op 12 juli naar een hotel in Amsterdam en op 13 juli gingen we met het vliegtuig naar Oslo. Vanaf Oslo werden we opgehaald en naar ons vakantiehuisje in Zweden gebracht, een rit van 3 uur.

And then we went to Sweden. Do you want to know what we did there? We left on July 12 to Amsterdam, stayed the night in a hotel and on July 13 we flew to Oslo. From Oslo we were driven to our holiday home. It took us three hours to get there.
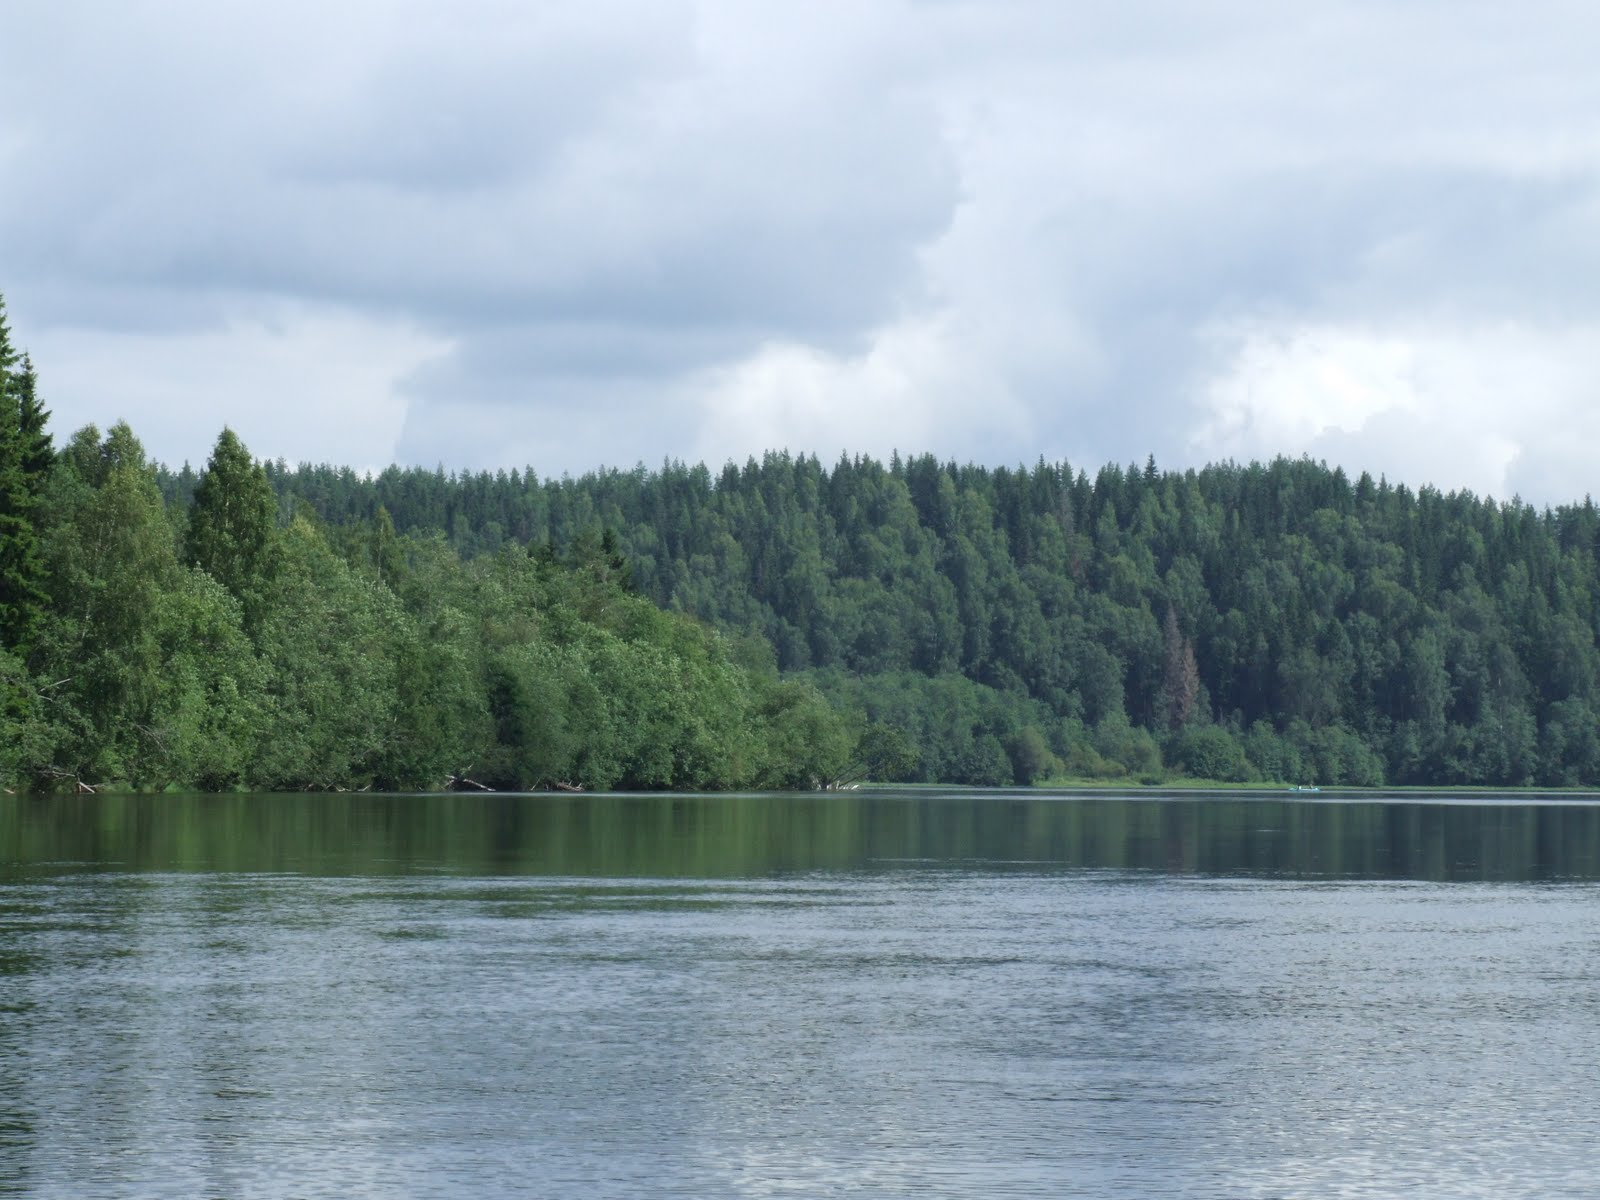
Het uitzicht vanaf het balkon van onze slaapkamer, de luchten in Zweden zijn adembenemend mooi.
The view from the balcony of our bedroom. The skies in Sweden are breathtakingly beautiful!


Een stroompje bij de weg bij het huisje.
A stream next to the road by the house.


 We liepen naar de rivier, dichtbj de rivier is het landschap soms erg plat. Lijkt surrealistisch na de wandeling vanuit de heuvels.
 We took a walk to the river, close to the river the landscape becomes flat. Seems surreal after the walk out of the hills.

 We gingen op een kano tocht op de rivier de Klaralven. Het was erg mooi. We zaten met drie personen in een boot en ik zat de eerste helft van de reis met mijn jongens in de boot en de meisjes zaten bij papa. Het was een lange tocht, 4.5 uur peddelen was iets te veel voor onze oudste twee.
 We took a canoetrip on the river the Klaralven and we used two boats. We sat with the three of us in one boat. At the first part of the trip I sat with my two boys and the girls sat with dad. It was a very long trip, 4.hours was a bit two much because the eldest two also had to peddle.


We gingen naar een kleinere rivier en we zijn bij verschillende kleine stroompjes geweest die naar een waterval stroomden.
 We went to a smaller river and watched a couple of small streams which lead to a waterfall.


 Deze foto is net boven de waterval genomen.
This picture is taken just above the waterfall.


 Na de waterval liepen we naar een pad waar je een route door een moeras loopt.
 After the waterfall we took a small path to a very moist area where it looked like a swamp at times.

 De witte korstmos en de luchtvochtigheid maakte het uitzicht erg spookachtig.
 The moist surroundings and the white vegetation on the ground looks very erie..

 We vierden mijn verjaardag mat chocoladetaart en donuts.
We celebrated my birthday with some choclatecake and donuts.


De laatste twee dagen zijn we naar Oslo geweest. Wat een stad! Geweldig! Levendig! Groots!
We gaan er samen nog eens heen, J en ik, we hebben niet alles wat we wilde zien kunnen zien.
We went to Oslo for the last couple of days and it was very nice there! It was alive! Great! Fabulous! Me and J will go to Oslo again sometime, we did not get the chance to see and do everything that we wanted to!
In Oslo bezochten we het Kon-Tiki museum (google: Thor Heyerdahl als je meer wilt weten) en het Vikingschipmuseum.
In Oslo we visited the Kon-Tiki museum (google: Thor Heyerdahl if you want to know more) and a vikingship museum.


Wat we ook nog deden:
-De kindern sprongen dagenlang op de trampoline bij het huisje.
-We speelden Vier op één rij en Schaken.
-We lazen.
-We aten en dronken lekkere worstjes en Zuivelproducten.
-We beklommen een berg.
-We gingen naar Karlstad.
-Ik kocht daar papier, garen, tricot garen (zpaghetti van hun eigen merk daar in Oslo en Karstad.) en stof en linten voor een tas.
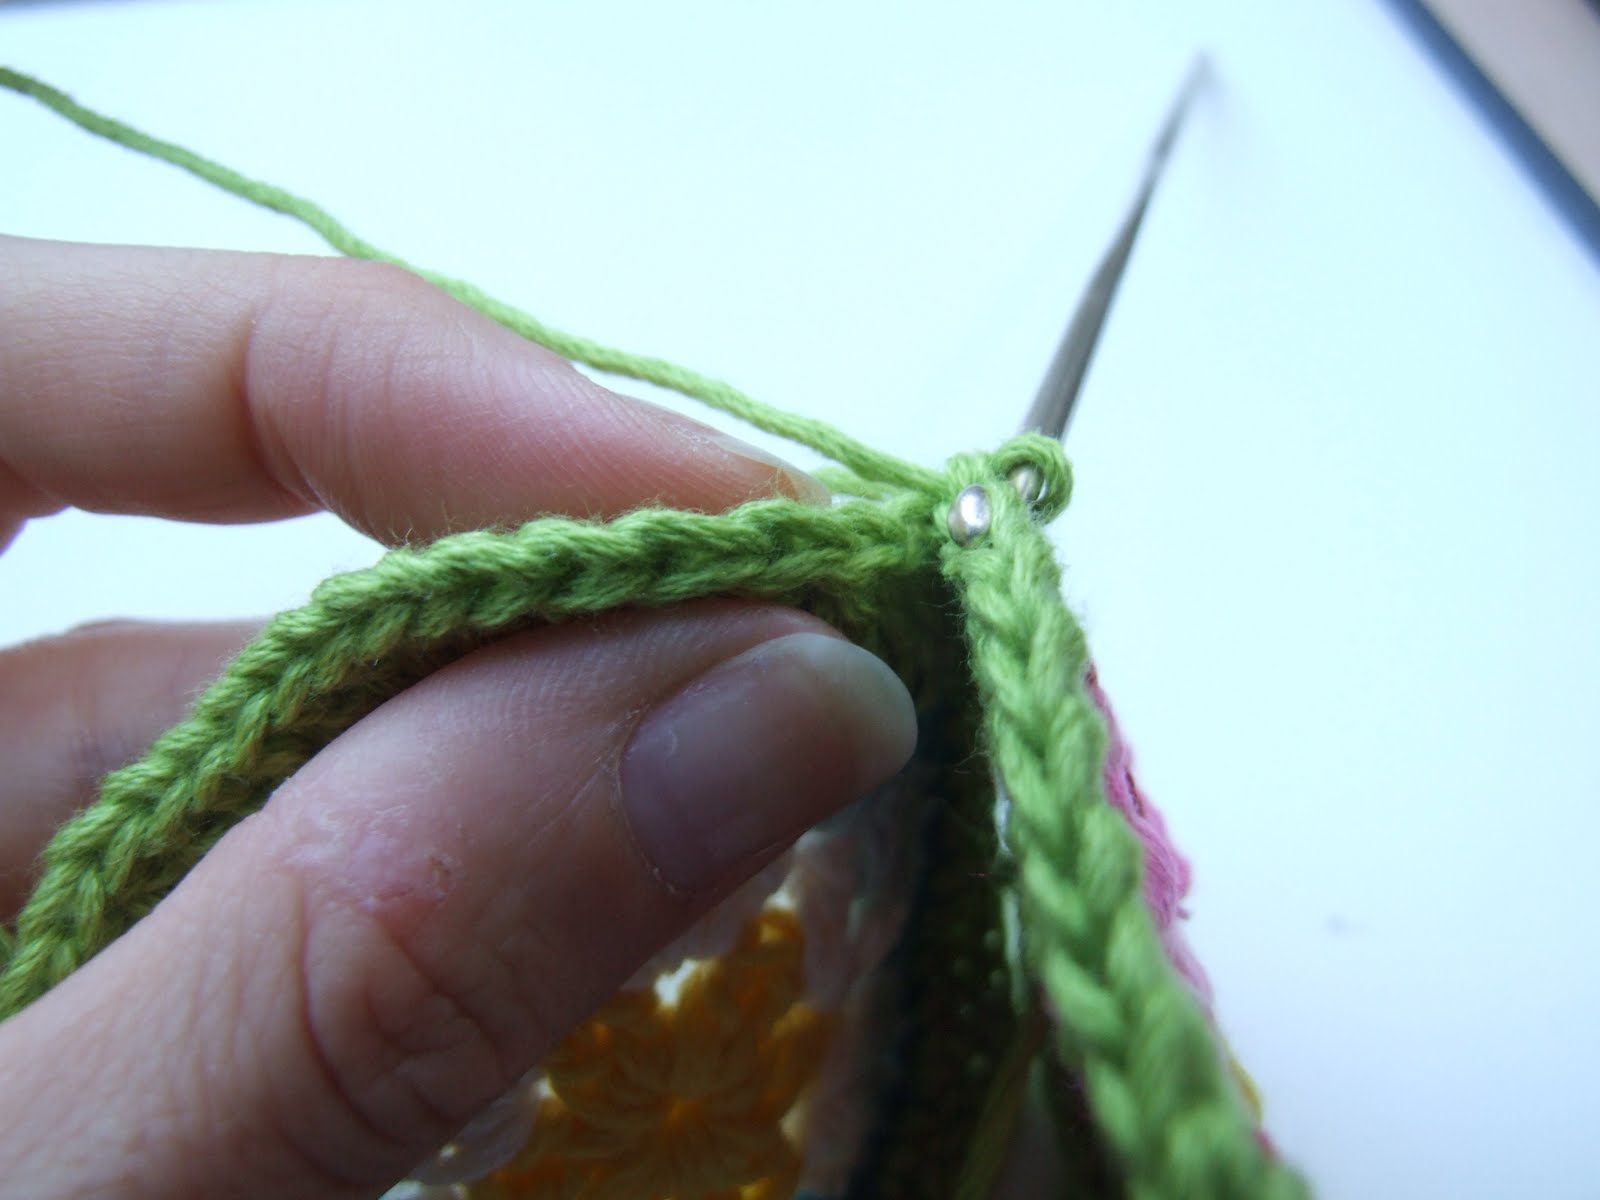
-Ik haakte een tafelkleedje!

What we also did:
-The kids jumped all day on the trampoline.
-We played games of Connect 4 and chess with the kids.
-We read books.
-We ate and drank lovely saucages and dairyproducts but did'nt like the bread.
-We climbed a mountain.
-We went to Karlstad
-I bought lovely paper, yarn, tricot yarn for a larger bag and fabric and ribbons for a bag.
-I crocheted a tablethrow:


De drie buitenste kleuren zijn kleuren die ook in onze woonkamer voorkomen.
The three outer colours of the throw come back in our livingroom.
De laatste twee foto's zijn hier in huis gemaakt.
The last two pictures are from our table at home, the other two were made in Sweden.

En... de kleuren voor mijn nieuwe project!! Dt is een project dat heel erg is geinspireerd door de kleuren in en om het huis in Zweden. Ik kocht dit garen in Zweden.
And the yarn and fabric for my newest project. This project is hugely inspired by the colours in en outside of our holiday home in Sweden. I bought this yarn in Sweden.


Ziet het er niet lieflijk uit? Ik  ga nog meer foto's hiervan posten want ik ben al een stukje verder.
Doesn't it look lovely and cute??? I'll post more about this project later this week.

We zijn weer thuis en het is waar; waar het klokje thuis tikt, tikt het nergens!
So were back home! It's true, there is no place like home!


Liefs/Love
The Crafty Witch

maandag 19 juli 2010

Het is hier fantastisch! Sweden is great!

Niet zoveel haakfoto's dit keer. We hebben al zoveel gedaan de afgelopen week. Gewandeld, een kanotocht, nog meer gewandeld, boodschappen gedaan in het dorpje. En alles op ons eigen rustige tempo, zonder haast, zonder schooltijden en werktijden om je aan te houden. Heerlijk! Zweden is adembenemend!
Een aantal foto's van onze kanotocht en bij ons huisje.

I haven't been crocheting much here. We are far to busy with other things! Like canoeing and hiking and going shopping in the village. Sweden is breathtaking!
We do everything nice and calm, no schedule to keep, no schoolschedule and workschedule to consider.

I have taken louds of pictures! These are just a couple of them to give you an idea of the lovely time we are having here!


Is de lucht niet waanzinnig prachtig?
Don't you just adore those skies?

Aan mijn nieuwe volgers! Welkom!
Thanks and a warm welcome to all my new followers!

maandag 12 juli 2010

Doeg! Bye!

Dus we gaan een dagje eerder naar Schiphol! Dat houdt in dat we morgen weggaan en dit dus voor de komende drie weken misschien wel mijn laatste blogpostje is! Hopelijk lukt het me om ondertussen af en toe iets te laten weten maar anders wens ik jullie mooi weer, waar je ook bent!
Hieronder nog wat foto's, mijn huidige project met de African Flower zeskanten en de Granny Stripe deken voor mijn meissie waar ik op vakantie ook aan zal werken!

So we are going to Schiphol airport a day early! That means we are leaving for Schiphol tomorrow and this is my last blogpost for the coming 3 weeks, maybe I'll be able to let you know what I am upto in Sweden but otherwise I will see you again in three week!

Below some pics of my current project with the African Flower Hexagons and my granny stripe blanket that I am going to work on in Sweden.


Doeg! bye!

Liefs, Love,
The Crafty Witch

vrijdag 9 juli 2010

The English Fantasy Flower bag Pattern

The English Fantasy Flower bag Pattern

Hier de link naar het Nederlandse patroon: http://craftyvalley.blogspot.com/2010/07/fantasy-flower-bag-pattern-fantasie.html


Hi everyone,


Now I can finally show you all my pattern and my finished bag! I'm so happy! Making the pattern is quite a lot of work because I'm really writing it twice, in Dutch and English, but I am so happy to be able to do this so I won't complain!
The bag is so lovely! I think that is because I am so addicted to the African Flower hexagon and you can make it quite fast!
But this message will be long enough so I'll begin with the finished bag pics!
Believe me, this bag wil get noticed, I recieved such lovely comments from complete strangers because of the bags! Are you ready because here are the pictures:

Yummie!!


And then my Little Girl wanted to fit the bag, she is holding the handle because it is too big for her.


Then she wanted to make a picture of me so I could show how it looks on me.
   
It looks good on me, doesn’t it?!                 
  
I am SOOOOOOOOOOO happy with this cute bag! I hope you'll enjoy it as much as I have and will have!   


THE PATTERN!

Are you ready?? Are you sure? Here it goes;

I am using the lovely soft Balans yarn. It is made of 50%cotton and 50% acrylic, this makes the bag a lot lighter than when you would make it with cotton, but it feels just as nice!
I used a 3mm hook but the label says 3.5 to 4 MM.
I used the following colours:

Balans yarn/garen:
Fuchsia 047
Yellow/Geel 173
Lime/Limoen 152
Lilac/lila 075
Natural/naturel 001
Green/groen 062
Green-silver/Groen-zilver 122
Turquois 049
Turquois light/licht 086
Pink/ roze 068
Purple/paars 074
Bodeaux 057
Navy blue/ Blauw Marine 134
purple-pink/ paars-rose (unknown)

You can order the yarn here. (It is in Dutch!)

Make sure you buy 3 skeins of the same color, this will become the handle and the last two rows. The handle eats yarn! So make sure you have enough!


We will start with the African Flower hexagons.

 
Row 1
-Chain 5 and join with a slip stitch. Then chain 3.


This counts as one double crochet. Then you make another double crochet. Chain 1 and then two double crochet. Repeat this 5 more times and join. 


ROW 2

-On this row you will work around the chain-stitches of the previous row (same as with granny squares).
Change colour.  Slip stitch around a chain of the previous row. Chain 3 (this counts as your first double crochet) and make a double crochet(around the same chain as the chain3), one chain and again two double crochet(around the same chain). Make another double crochet but then into the next chainstitch of the previous row. Mind that you don’t make a chain between the double crochet stitches while changing from one previous row chain to the next chain. The pictures can explain this even better.


Work around into all six chainstitches on the previous row.
You should have, two double crochet-one chain-two double crochet-(next stitch) two double crochet-one chain-two double crochet..repeat until you can join with a slip stitch.

ROW 3


Change colour.
-You’ll work in the stitches of the previous row again.
Chain 3 into the chainstitch of the next row. This counts as one double crochet. Make 6 more double crochets stitches into this chain. So it’s 7 in total. Then make 7 double crochets in chain stitch of the previous row. Work around the flower until you have 6 petals. Then join.


ROW 4

Change colour
Now you’ll make single crochet stitches in the stitches of the previous row. Don’t start at an opening but begin with the first stitch on a petal. Make single crochet stitches until you reach the opening between two petals.
Make a single crochet stitch around the stitch on row 3 and 2! The picture shows this much better than I can explain. Work all the way around this row.
     
When you finish the row put another single crochet into the first stitch you made and make a slip stitch to join.


This stitch really brings out the petals, make sure you make this with a contrasting (or darker or lighter) colour.

ROW 5

Change colour
-Chain three, make double crochet stitches all around the petal. On every top stitch of every petal you make two double crochet stitches with one chain in between, this makes the hexagon shape. Work around the row and join with a slip stitch.

 
SEWING THE FLOWERS TOGETHER.

Make 7 african flower hexagons. Now you will sew them together. I can tell you about this for an hour but I hope the pictures will help you. Hold two flowers with the left side against each other in your hand. Now you will make single crochet stitches into the stitches of the flowers, but mind, you won’t pull through both stitches entirely but just the two loops on the outside of the hexagons.
Sew all 7 flowers together like the ones you can see on the pictures below.

 
 This is what it looks like while sewing the flowers together.


FILLING THE GAPS.
Use the same colors as the outlines of your hexagons.
After sewing the flowers together you will fill the gaps. You will do this using double crochet. Slip stitch, make one double crochets and then as much as needed to fill the gaps. But mind, don’t make to much double crochet stitches because the bag will wobble if you make too much stitches here.

   
Make another row of double crochet, You’ll need three rows of double crochet to finish the gaps.


Then it should look like
this. You will fill all the gaps between the hexagons in this manner.

WORKING AROUND THE HEXAGONS

Use a different color. Make two entire rows of half double crochet and start with 2 chain stitches. This will make the bag nice an tight. Use a different color for every row.


MAKING THE SHELLS

Now you will make shells. Use a different color. First make single crochet stitches and when are three stitches before you reach the middle of a flower or the middle of a gap. Then make a double-double crochet stitch. So don’t make one loop around your hook but two, the pictures shows you how to do this. 
So make one double-double crochet stitch and skip three stitches, make the stitch and make 8 more double-double crochet stitches.
Then start making single crochet stitches again. Until you reach the next middle of a flower or gap. You will make 12 shells in total.


MAKING ANOTHER ROW

-Use a different color. Chain three and double crochet all around the bag. Work around the single crochet stitches so you cannot see them anymore.
It should look like this.

MAKING TWO MORE ROWS
You’ll make two more rows of double crochets in different colors just like the rows before.

MAKING THE FINAL ROWS

The last two rows are in the same color, this color will be the same color you will use for the handle. Make sure you have enough yarn! It took me 2 or 3 skeins depending on how long and wide you make the handle.
To make the bag nice and tight, make the very last row in half double crochet.

It should look like this:

Doesn’t it look great? Now you will make the back of the bag, exactly the same as the front. So then you will have two sides like this one.

MAKING THE HANDLE
After finishing both sides you will make the handle.
Chain 14. Then make 3 more chain stitches (counting as the first double crochet stitch) and then make 13 double crochet stitches.
Join and* chain 3, make 13 double crochet stitches.* repeat between * until you made the handle long enough .
I can advise you to begin sewing the handle to the bag when you are almost halfway. That way you can fit the bag and make sure it is not too long because it does stretch out! You can see it halfway done in the picture below.

This is how you begin.

Mind you, it does take quite some time to finish.


Then you will sew this onto the bag just like you did with the flowers. But please take notice that it is very important not to make the opening too bag, I gave it a small opening, just enough for me to fit my wallet and make a notepad. As you can see on the picture at the top of this blogpost, There are three shells in between the opening. To make the opening a bit firmer you could make an edge or just a single stitch in the previous row around the edge of the opening.


It should look like this when finished!

Your very own Fantasy Flower bag is finished!! I hope you enjoyed it as much as me and everything makes sense, if you have any questions, please email me!

I did not line the bag because I haven't got the time now.
Maybe I’ll make a tutorial for the lining too!

But now I am going to pack the bags and suitcases, enjoy the World Cup on Sunday (HUP HOLLAND!) and go to Sweden on Tuesday! You can email me though, I might be able to use the internet there. I really hope so! I’ll be back in Holland on July 31.
I have enough lovely projects to finish/make, what are you guys working on?
Hhappy crocheting!


Liefs/Love
The Crafty Witch